I am really excited to share this with everyone today. I build a farmhouse table. I had been wanting to get a new dining room table but felt overwhelmed with the idea of building one. I decided to just go and do it. I wanted to create one that was the perfect size for my space, fit my style, and my budget. All things that needed to be kept in my mind when creating this. And all things I could not accomplish if I went and purchased one similar at a store.


I began with deciding on plans of the size for our new farmhouse table. I measured out the space and landed on a happy place of it being. The size of my table is 4 feet wide, 5 feet long and 32 inches high. My old dining room table was 30 inches, I wanted to make this one slightly taller but still keeping it in the realm of a standard table height.

I began this project by creating the table top. I had a great angled idea for my table top. I wanted to make mine be different from other farmhouse tables, get a little creative. I decided to split the table top down the middle and then have the wood planks angle out from there. To create the table top I cut the plywood down to my desired size.


Then it was time to add the wood planks. I chose a 1 inch thick pine wood plank for the top. With varying details and knots to add character. To fit them I cut a 45 degree angle at one side. Set the board on the plywood. Already having marked the plywood halfway down the center. I set the planks along the center.


Leaving the longer side over the edge, showing me the excess board amount. Then drawing a line where the end of the plywood is on the wood planks. Cutting on that line. I was able to repeat this step to cut all of the wood planks for the table top.

When all were cut, I brought it into the house. Made sure the cuts were even, set snug against each other. Using wood glue, laying it on in rows on the plywood surface.


Pushing down on the planks to get it in the correct spot. Then flipping my coffee table and anything heavy to weigh it down. I let the table top sit with the wights on over night to make sure the wood glue set. In the morning none of the planks moved after that.

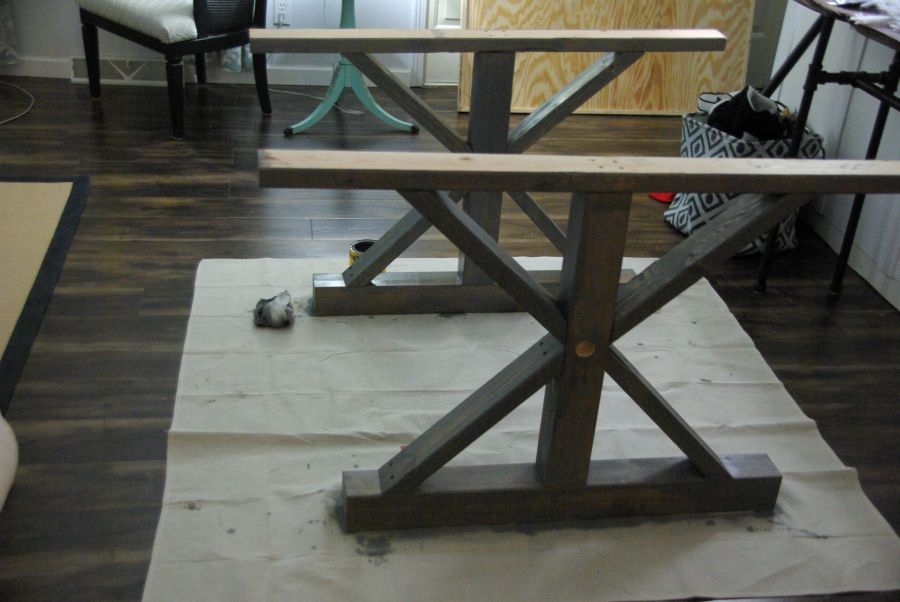
While the glue was setting I began the steps needed to create the legs. Before I got started I purchased a galvanized pipe that is 3 ft long, 1 inch in diameter and spray painted it black. This pipe will go in between the two legs. Now it was time to make the legs. Using the 4×4 as the leg base, cutting it 3 ft long. This allows it to be 1 foot shorter then the width of the table. I wanted it to be sturdy enough to hold the table. But not poking out the sides and making it difficult for people to sit.

Next use another 4×4 as the center post attaching the top to the base. The height of this was 25 inches long. Allowing the height of the base 4×4 and the table top thickness to equal 32 inches total. My desired height for the table. Screw the two 4×4’s together creating a T shape.

Taking a 2×4 cutting it 48 inches long. This will be the piece running under the table top itself. So having it be shorter then the width of the table was necessary. Screw this 2×4 to the T shaped 4×4, making it a oddly shaped H.

Then it is time to add the angled detail on the legs. Using a 2×4 and cutting a 45 degree angle. Cutting them to be 18 inches long. This will bring the 2×4’s angled from the center post to the base and the tabletop. Creating a X.


Screw them into the odd shaped H and I now have farmhouse legs.

To add the detail I wanted with the galvanized pipes. I drilled a hole slightly larger then 1 inch in the center of the X in the legs.

Drilling slowly with a drill bit tip. Just enough space to have the pipe slide through the hole to the other side.

The tabletop is glued on and I need to make the edges pretty by adding a frame on it. Using 1 inch wide by 1/2 inch thick pine long boards. Cutting them the length of the table and then 45 degree cutting them. This allows the corner to be flush, and sitting directly together. Creating a clean corner apperance.

Nailing them into place around the wood planks.

After this I needed to do a lot of sanding. There is a few uneven wood planks that need to be smooths out. I want the surface to be as flat as possible so that food and plates can sit on it without tipping over. Taking a electric sander and just running it along until the surface felt smooth.


Once the sanding was done I took it in to stain it. Using Milwax classic gray color. Taking my gloved hand and dipping the rag into the wood stain can. Wiping the rag at the angle of the table top, going with the wood grain.

I spread it out evenly, being sure to use long strokes to keep the brush marks off of the wood.

Staining the legs was needing to be more thorough. There is lots of corners, crevices, and grooves that the stain needed to get in. Being careful to not let any drips happen. If they did wipe quickly over them and the drips should blend in.
I liked the lighter look of the table top, so I only did one coat for the top. But did two for the legs.

![]()
Checking to see if it was dry. Once I could feel it and had nothing come off or any sticky feeling to the stain I knew it was dry. With this being a table it needs to be sealed with a clear lacquer. This will seal in the stain, help protect the wood from moisture and heat. Putting it on with a paintbrush and simply painting it on.
![]()
Doing wide strokes again to help blend in any brush lines. It was not necessary to brush this along the wood grain. And it is needed to get the clear coat over the cracks as well. Do not avoid them. I did two coats. I would recommend to at least do two for any table top.

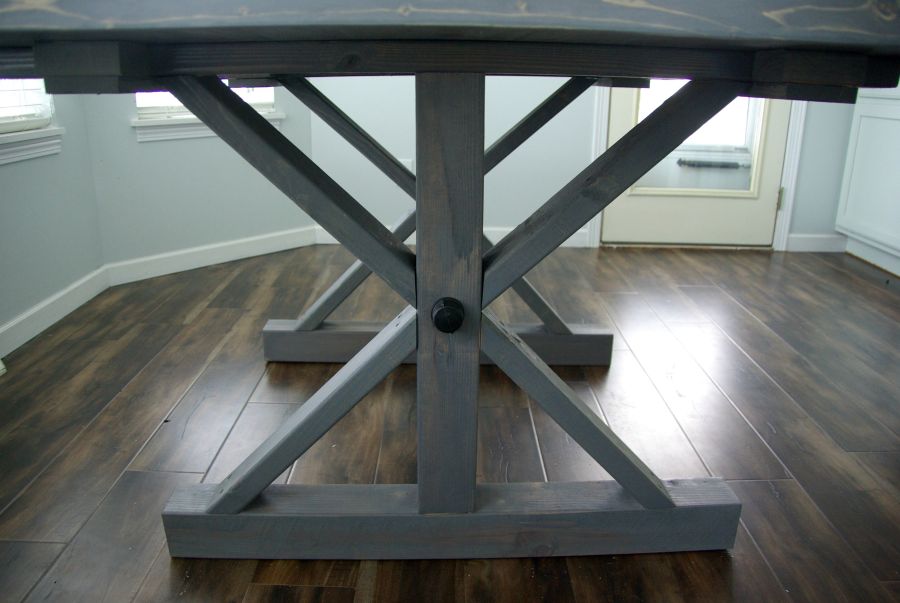
With all of this stained and ready to go it was time to connect the top to the legs and call this a farmhouse table. To do this I cut small squares from 2×4’s to set on either side of the boards on the underside of the table top.

Using the galvanized pipe and pushing it into the hole.

Then screwing the end cap on once the pipe is pushed through. This allows the two table legs to be connected.

Then checking measurements on all sides to confirm the legs are evenly in the middle before I begin securing them. Then cutting a piece the length of the two sides to set on top. Screwing them into place. I also turned the table upside down again and stained tis portion with stain once it was connected.

I chose to do this instead of just screwing the legs to the top because I wanted to make sure that the screws would not come through to the surface and break the top wood planks. With the table only being 1 inch thick the screws would most likely come through. There is also a added benefit of making this table movable. This gives a easy place to disassemble the table if I have to move it out of the room.

After this was done, my farmhouse table was done. I had 4 farmhouse chairs from my previous table that works well with it, along with a bench. I can comfortably sit 2 adults on all sides of this table. And can squish 3 on the sides if needed. It is a big table without feeling too big.


With the dark gray stain and the angled wood planks it gives a contemporary feel to a standard farmhouse table. Adding the galvanized pipes and the X shaped legs also brings even more detail to the table.


I enjoy a rustic look, but always have to make it feel modern to me and my home. This table blends the two together wonderfully. I also only spent $78 from start to finish for everything down to the screws for the table. I don’t even want to think how much I would have spent had I purchased this table new from a store.

There are so many wonderful details about this table. I wanted to be sure to not do too much. And worried that with the angled top, the X legs, and the pipe it would be too much. I think with the dark gray stain it all works together.


So if you are like me and wanting to create your own table. Do it! There was a lot of steps to take, but none of them were too complicated. Once breaking it down I realized that my fear of it was unnecessary. It was a fun project that I would gladly do again. I hope you give it a try!


You’re reading DIY A Farmhouse Table – Modernizing the Traditional , originally posted on Homedit. If you enjoyed this post, be sure to follow Homedit on Twitter, Facebook and Pinterest.
The post DIY A Farmhouse Table – Modernizing the Traditional appeared first on Home Decorating Trends – Homedit.
via. Home Decorating Trends