A year ago, I posted this article, which linked to a really amazing table constructed out of a reclaimed piece of butcher block and cast iron pipe fittings for legs, like so:
I’ve always loved the industrial feel of it, and when I picked up an old Kelsey Letterpress earlier this year, I knew this was exactly what I wanted to build as a work table for it.
Unfortunately, even after a ton of scouting around on Craigslist and my local habitat stores, the Husband and I still couldn’t manage to find any salvaged butcher block. We couldn’t imagine using any other material, though, so after a little brainstorming we devised a plan to make our own.
The table was not going to be huge, about 2×3′, so the material list was simple, and mostly pulled from the list in the original DIY post:
For the tabletop, we picked up a stack of 1×3 pine boards from the hardware store, pipes for the legs, and 8 flanges to make feet and to attached the legs to the table top. We also managed to snag some rub-on stain for $3.00 on clearance, some black and blue spray point to go over the legs with, and finally, a length of chain for a couple of dollars (Chain? What for? You’ll see…)
In Which We Make a Tabletop…
Back in the basement, the prep process for the butcher block itself was quick and easy. For speed sake, we decided to scrap the idea of going with multiple lengths of wood in each row (although we definitely could have gone that route) and instead cut all the boards to the same length.
Then, we began assembly, board by board. To make sure everything stayed tightly together, we applied a bead of wood glue between each new layer of wood, and used a nail gun 4-5 times on each row. Since we were going for an aged, industrial look, we even plugged some nails on the outside to help hold the outer pieces together with no plans to putty over them.

Sanding was the longest part of the entire process. Not only did we have to smooth down all the ends, but because the wood was all of slightly varying heights, we had a ton to sand down on the top, too. A planer would have made this process a LOT faster. Eventually we got so tired of sanding that we cheated and left what would be the bottom untouched.
Since we were going for an old industrial look, we actually pulled out the length of chain we purchased earlier and used it to take out some suppressed frustrations on the table top by giving it a thorough beating. We also found some old oily rags and dragged them across the top, and gouged out a few areas with a screw driver.
Then, we stained the final product and let it sit to dry.
… And Then Some Legs
We went with an H construction for our legs as well, and because they just screw together, the hardest part of the base assembly was making sure each side was even.
Since we were going for the whole vintage industrial look, we decided to spray paint the legs.
If we were smart, we would have done it before attached them to the table top, but we weren’t, so we used a garbage bag and painter’s tape to protect the surface. First went on a solid coat of bright blue paint. After a few hours of drying time, we layered on black so that there were just hints of the blue showing through. There was tape and stickers on the parts from when we purchased them, so we just left them there and painted over, to give it an even more vintage, used feel.

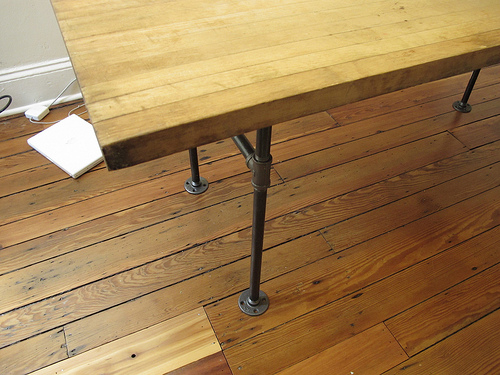
And the final product: We’re pretty happy with the results, and even thought about making a few extras to sell and give to friends and family.

Project Cost & Time
Though we sort of failed on the mark of keeping an exact cost on everything, the project didn’t run much more than $100 for all the materials. We went with the cheapest pine available, and purchased in lengths where we could maximize how many strips we could cut from each. The biggest part of the cost was for the legs; next time we might try hairpin legs instead.
Total production time was around 4-6 hours, but a lot of that time was sanding (which could be GREATLY reduced if you could get ahold of a planer) and the in-between times when we were waiting on stain to dry.
via. Lovely Spaces