With summer in full swing and taking inspiration from all the beautiful colours of the season, we have created a super-easy yet stunning project that would be perfect for a wedding or wedding shower photo shoot. This DIY photobooth backdrop is created using different sizes and colours of Post-it® Notes and Page Markers and is inspired by beautiful stained glass windows. We think it makes for a background that pops and love the rainbow effect that surprised us! Here’s how we made it:
What You’ll Need
Level, string and masking tape for measuring
1 pack of Post-it® Notes from the Rio de Janeiro Colour Collection (3 in) – 5 pads per pack of assorted colours
1 pack of Post-it® Notes from the Bali Colour Collection (3 in) – 5 pads per pack of assorted colours
1 pack of Post-it® Notes from the Capetown Colour Collection (3 in) – 5 pads per pack of assorted colours
1 pack of Post-it® Notes from the Capetown Colour Collection (3 in) – 5 pads per pack of assorted colours
1 pack of Post-it® Page Markers from the Assorted Fluorescent Colour Collection (1 in x 3 in) – 4 pads per pack
1 pack of Post-it® Notes from the Rio de Janeiro Colour Collection (4 in x 6 in) – 3 pads per pack of assorted colours

To Make
Create a space on a wall measuring 152.4 cm (60 inches) wide and 101.6 cm (40 inches high). Clean to make sure it is clear of any dirt or grease. Wait for it to dry. To create a straight line for a guide, we grabbed our level and lined up a piece of string alongside of it (first horizontally) and secured with masking tape. This became the horizontal guide. Then we did the same in the centre (vertically).
 |
| Create a straight line using a level and string |
 |
| Tape string with masking tape |
 |
| Measure horizontally and mark with a string and tape in the centre |
 |
| Create a stain glass effect using different colours and sizes of notes |
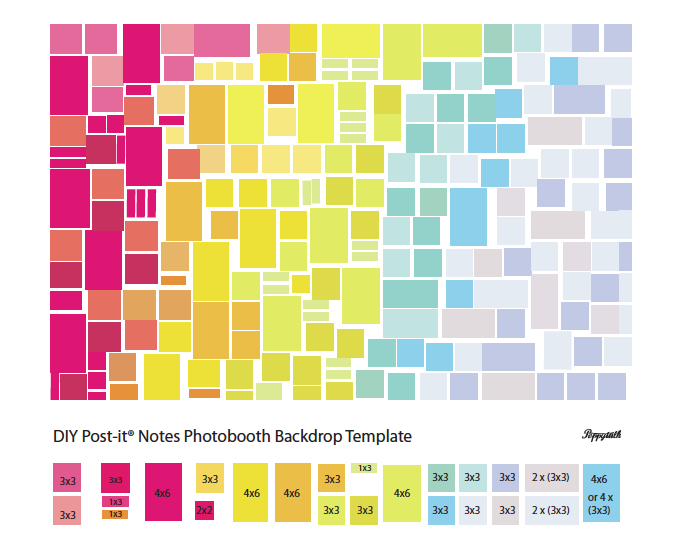
As we wanted it to look like stained glass, we followed a rainbow colour scheme for the effect. Starting with pinks, flowing into orange, then yellows, followed by greens and blues and lastly, purple. Starting on the left hand side, we began to place various sizes of pinks, remembering to switch up the hues with each placement in most places, and staying the same in others (depending on the size. You could make your own design, or if you wish, you can follow ours using a template we’ve created that you can download. See template illustration below, or download a pdf version here.

Continue on, and then at a diagonal, switch to the next colour, oranges and yellow. Again, switching different sizes and hues. The same for the greens and then the blues. When you hit
the right side end, you’ll find things won’t end evenly. So what you’ll have to do is measure and trim the end pieces to fit.
We loved how it turned out, let’s take a look and check out what we did with Post-it